
RabbitMQ入门
一、RabbitMQ安装
简单概述:RabbitMQ是一个开源的遵循AMQP协议实现的基于Erlang语言编写,支持多种客户端(语言)。用于在分布式系统中存储消息,转发消息,具有高可用,高可扩性,易用性等特征。
1:下载地址:https://www.rabbitmq.com/download.html 2:环境准备:CentOS7.x+ / Erlang RabbitMQ是采用Erlang语言开发的,所以系统环境必须提供Erlang环境,第一步就是安装Erlang。
查看两者兼容性:https://www.rabbitmq.com/which-erlang.html

1. 安装Erlang
参考地址:https://www.erlang-solutions.com/downloads/
wget https://packages.erlang-solutions.com/erlang-solutions-2.0-1.noarch.rpm
或者
rpm -Uvh erlang-solutions-2.0-1.noarch.rpm
yum install -y erlang
erl -v2. 安装socat
yum install -y socat3. 安装rabbitmq
下载地址:https://www.rabbitmq.com/download.html
> wget https://github.com/rabbitmq/rabbitmq-server/releases/download/v3.8.13/rabbitmq-server-3.8.13-1.el8.noarch.rpm
> rpm -Uvh rabbitmq-server-3.8.13-1.el8.noarch.rpm
启动rabbitmq服务
# 启动服务
> systemctl start rabbitmq-server
# 查看服务状态
> systemctl status rabbitmq-server
# 停止服务
> systemctl stop rabbitmq-server
# 开机启动服务
> systemctl enable rabbitmq-server
4. RabbitMQ的配置
RabbitMQ默认情况下有一个配置文件,定义了RabbitMQ的相关配置信息,默认情况下能够满足日常的开发需求。如果需要修改需要,需要自己创建一个配置文件进行覆盖。
参考官网:
1:https://www.rabbitmq.com/documentation.html
2:https://www.rabbitmq.com/configure.html
3:https://www.rabbitmq.com/configure.html#config-items
4:https://github.com/rabbitmq/rabbitmq-server/blob/add-debug-messages-to-quorum_queue_SUITE/docs/rabbitmq.conf.example
5. 相关端口
5672:RabbitMQ的通讯端口
25672:RabbitMQ的节点间的CLI通讯端口是
15672:RabbitMQ HTTP_API的端口,管理员用户才能访问,用于管理RabbitMQ,需要启动Management插件。
1883,8883:MQTT插件启动时的端口。
61613、61614:STOMP客户端插件启用的时候的端口。
15674、15675:基于webscoket的STOMP端口和MOTT端口
一定要注意:RabbitMQ 在安装完毕以后,会绑定一些端口,如果你购买的是阿里云或者腾讯云相关的服务器一定要在安全组中把对应的端口添加到防火墙。
二、RabbitMQ管理
1. RabbitMQ管理界面
默认情况下,rabbitmq是没有安装web端的客户端插件,需要安装才可以生效
rabbitmq-plugins enable rabbitmq_management
安装完成后重启服务
systemctl restart rabbitmq-server
2. 授权账号和密码
新增用户
rabbitmqctl add_user admin admin设置用户分配操作权限
rabbitmqctl set_user_tags admin administrator用户级别:
1、administrator 可以登录控制台、查看所有信息、可以对rabbitmq进行管理
2、monitoring 监控者 登录控制台,查看所有信息
3、policymaker 策略制定者 登录控制台,指定策略
4、managment 普通管理员 登录控制台
为用户添加资源权限
rabbitmqctl set_permissions -p / admin ".*" ".*" ".*"3. 小结
rabbitmqctl add_user 账号 密码
rabbitmqctl set_user_tags 账号 administrator
rabbitmqctl change_password Username Newpassword 修改密码
rabbitmqctl delete_user Username 删除用户
rabbitmqctl list_users 查看用户清单
rabbitmqctl set_permissions -p / 用户名 ".*" ".*" ".*" 为用户设置administrator角色
rabbitmqctl set_permissions -p / root ".*" ".*" ".*"
4. Docker启动
安装好docker环境,直接执行下面即可
docker run -di --name myrabbit -e RABBITMQ_DEFAULT_USER=admin -e RABBITMQ_DEFAULT_PASS=admin -p 15672:15672 -p 5672:5672 -p 25672:25672 -p 61613:61613 -p 1883:1883 rabbitmq:management注意问题:
使用docker安装了个rabbitmq,访问UI界面的【Channels菜单】有这样的提示:==Stats in management UI are disabled on this node==。主要原因是图表统计功能被禁用,需要修改默认配置。
#进入容器后,cd到以下路径
cd /etc/rabbitmq/conf.d/

#修改 management_agent.disable_metrics_collector = false
echo management_agent.disable_metrics_collector = false > management_agent.disable_metrics_collector.conf

#重启rabbitmq容器
docker restart {rabbitmq容器id或容器名称}
三、RabbitMQ角色分类
1. none
不能访问management plugin
2. management:查看自己相关节点信息
列出自己可以通过AMQP登入的虚拟机
查看自己的虚拟机节点 virtual hosts的queues,exchanges和bindings信息
查看和关闭自己的channels和connections
查看有关自己的虚拟机节点virtual hosts的统计信息。包括其他用户在这个节点virtual hosts中的活动信息。
3. Policymaker
包含management所有权限
查看和创建和删除自己的virtual hosts所属的policies和parameters信息。
4. Monitoring
包含management所有权限
罗列出所有的virtual hosts,包括不能登录的virtual hosts。
查看其他用户的connections和channels信息
查看节点级别的数据如clustering和memory使用情况
查看所有的virtual hosts的全局统计信息。
5. Administrator
最高权限
可以创建和删除virtual hosts
可以查看,创建和删除users
查看创建permisssions
关闭所有用户的connections
四、Rabbitmq初体验
1. 实施步骤
创建普通maven工程,导入rabbitmq的maven依赖
定义生产者
定义消费者
观察消息的在rabbitmq-server服务中的过程
2. 环境搭建
依赖jar包
<!--java原生依赖-->
<dependency>
    <groupId>com.rabbitmq</groupId>
    <artifactId>amqp-client</artifactId>
    <version>5.10.0</version>
</dependency>
3. 定义生产者
package com.wz.sdkservrabbitmq.simple;

import com.rabbitmq.client.Channel;
import com.rabbitmq.client.Connection;
import com.rabbitmq.client.ConnectionFactory;

/**
 * @DESCRIPTION: 简单simple模式
 * @USER: wangzhen
 * @DATE: 2022/8/19 12:24
 */
public class Producer {
    public static void main(String[] args) {
        // 1: 创建连接工厂
        ConnectionFactory connectionFactory = new ConnectionFactory();
        // 2: 设置连接属性
        connectionFactory.setHost("139.224.198.15");
        connectionFactory.setPort(5672);
        connectionFactory.setVirtualHost("/");
        connectionFactory.setUsername("guest");
        connectionFactory.setPassword("密码");
        Connection connection = null;
        Channel channel = null;
        try {
            // 3: 从连接工厂中获取连接
            connection = connectionFactory.newConnection("生产者");
            // 4: 从连接中获取通道channel
            channel = connection.createChannel();
            // 5: 申明队列queue存储消息
            /*
             *  如果队列不存在,则会创建
             *  Rabbitmq不允许创建两个相同的队列名称,否则会报错。
             *
             *  @params1: queue 队列的名称
             *  @params2: durable 队列是否持久化,该参数决定了rabbitmq服务重启后,队列是否存在
             *  @params3: exclusive 是否排他,即是否私有的,如果为true,会对当前队列加锁,其他的通道不能访问,并且连接自动关闭
             *  @params4: autoDelete 是否自动删除,当最后一个消费者断开连接之后是否自动删除消息。
             *  @params5: arguments 可以设置队列附加参数,设置队列的有效期,消息的最大长度,队列的消息生命周期等等。
             * */
            channel.queueDeclare("queue1", false, false, false, null);
            // 6: 准备发送消息的内容
            String message = "吾之初心,虽死犹生!";
            // 7: 发送消息给中间件rabbitmq-server
            // @params1: 交换机exchange
            // @params2: 队列名称/routing
            // @params3: 属性配置
            // @params4: 发送消息的内容
            channel.basicPublish("", "queue1", null, message.getBytes());
            System.out.println("消息发送成功!");
        } catch (Exception ex) {
            ex.printStackTrace();
            System.out.println("发送消息出现异常...");
        } finally {
            // 7: 释放连接关闭通道
            if (channel != null && channel.isOpen()) {
                try {
                    channel.close();
                } catch (Exception ex) {
                    ex.printStackTrace();
                }
            }
            if (connection != null) {
                try {
                    connection.close();
                } catch (Exception ex) {
                    ex.printStackTrace();
                }
            }
        }
    }
}
运行之后登录rabbitmqWEB页面,可以到一条消息已经处于就绪状态:
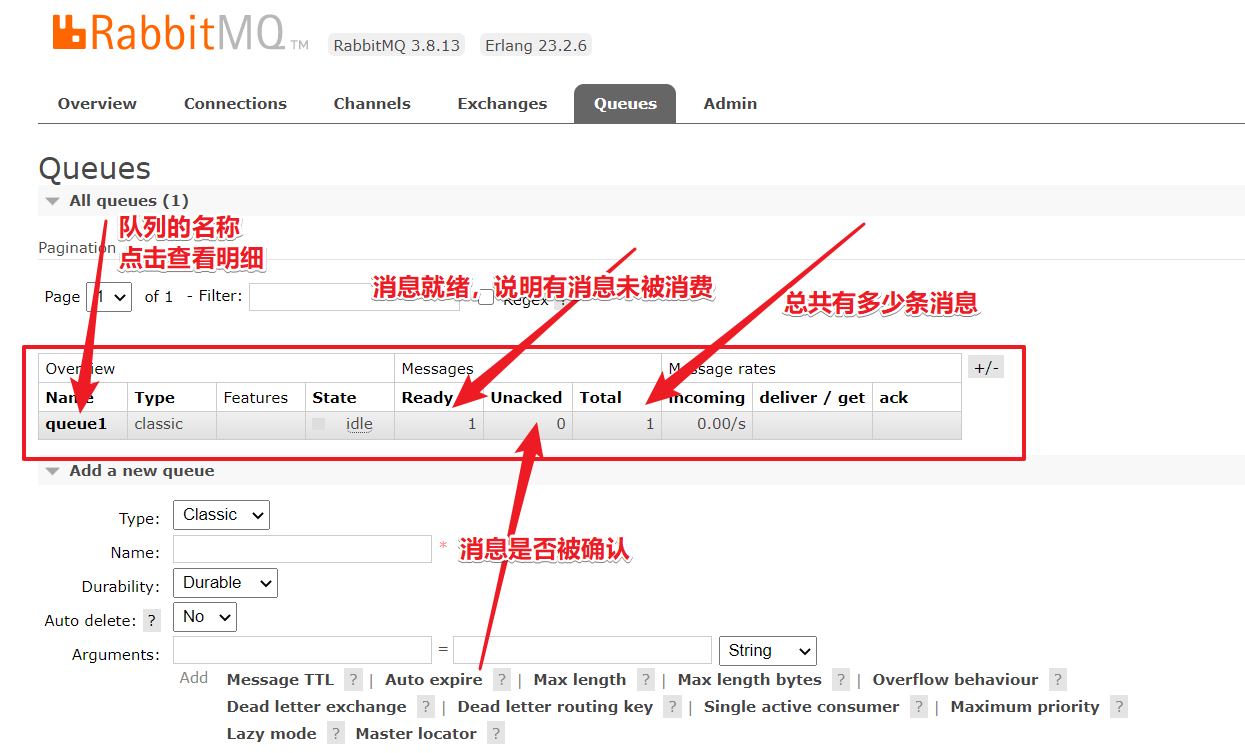
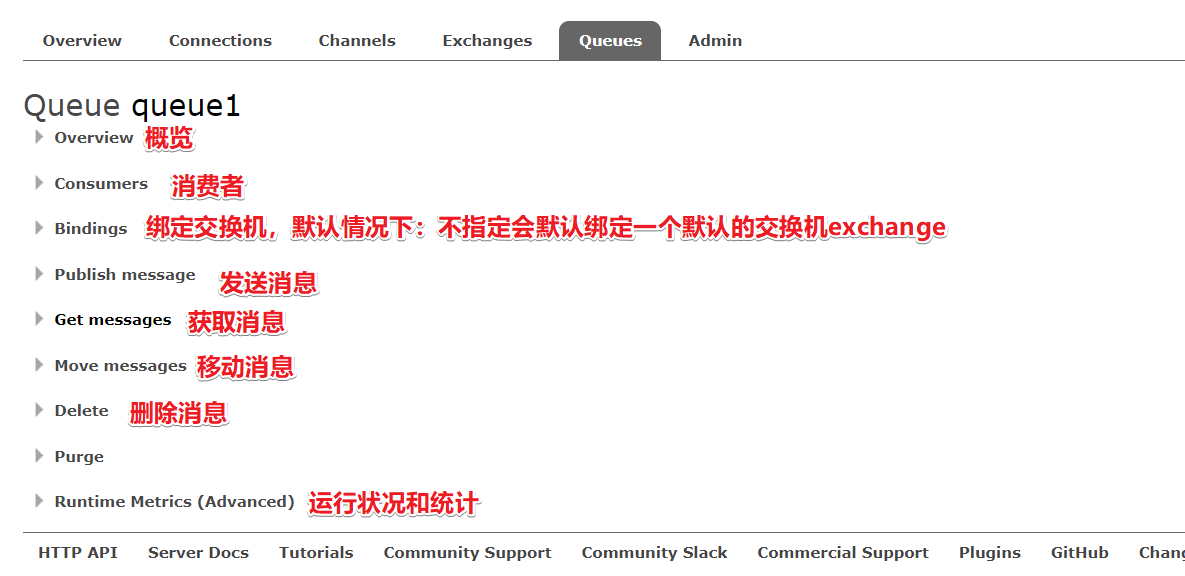
队列菜单栏中的信息
4.定义消费者
package com.wz.sdkservrabbitmq.simple;

import com.rabbitmq.client.*;

import java.io.IOException;

/**
 * @DESCRIPTION:
 * @USER: wangzhen
 * @DATE: 2022/8/19 12:24
 */
public class Consumer {
    public static void main(String[] args) {
        // 1: 创建连接工厂
        ConnectionFactory connectionFactory = new ConnectionFactory();
        // 2: 设置连接属性
        connectionFactory.setHost("139.224.198.15");
        connectionFactory.setPort(5672);
        connectionFactory.setVirtualHost("/");
        connectionFactory.setUsername("guest");
        connectionFactory.setPassword("密码");
        Connection connection = null;
        Channel channel = null;
        try {
            // 3: 从连接工厂中获取连接
            connection = connectionFactory.newConnection("消费者");
            // 4: 从连接中获取通道channel
            channel = connection.createChannel();
            // 5: 申明队列queue存储消息
            channel.basicConsume("queue1", true, new DeliverCallback() {
                @Override
                public void handle(String s, Delivery delivery) throws IOException {
                    System.out.println("消息接收成功:" + new String(delivery.getBody(), "UTF-8"));
                }
            }, new CancelCallback() {
                @Override
                public void handle(String s) throws IOException {
                    System.out.println("消息接收失败");
                }
            });
        } catch (Exception ex) {
            ex.printStackTrace();
            System.out.println("接收消息出现异常...");
        } finally {
            // 6: 释放连接关闭通道
            if (channel != null && channel.isOpen()) {
                try {
                    channel.close();
                } catch (Exception ex) {
                    ex.printStackTrace();
                }
            }
            if (connection != null) {
                try {
                    connection.close();
                } catch (Exception ex) {
                    ex.printStackTrace();
                }
            }
        }
    }
}
执行之后,消息清除,队列是还在。
五、RabbitMQ组成部分
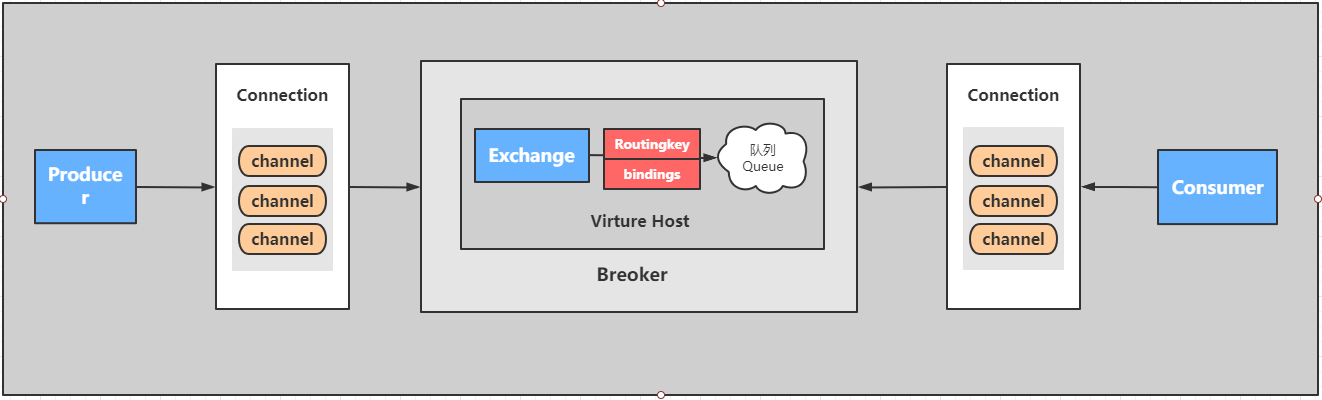
1. 核心概念
Server:又称Broker ,接受客户端的连接,实现AMQP实体服务。 安装rabbitmq-server Connection:连接,应用程序与Broker的网络连接 TCP/IP/ 三次握手和四次挥手 Channel:网络信道,几乎所有的操作都在Channel中进行,Channel是进行消息读写的通道,客户端可以建立对各Channel,每个Channel代表一个会话任务。 Message :消息:服务与应用程序之间传送的数据,由Properties和body组成,Properties可是对消息进行修饰,比如消息的优先级,延迟等高级特性,Body则就是消息体的内容。 Virtual Host 虚拟地址,用于进行逻辑隔离,最上层的消息路由,一个虚拟主机理由可以有若干个Exhange和Queueu,同一个虚拟主机里面不能有相同名字的Exchange Exchange:交换机,接受消息,根据路由键发送消息到绑定的队列。(==不具备消息存储的能力==) Bindings:Exchange和Queue之间的虚拟连接,binding中可以保护多个routing key. Routing key:是一个路由规则,虚拟机可以用它来确定如何路由一个特定消息。 Queue:队列:也成为Message Queue,消息队列,保存消息并将它们转发给消费者。
2. RabbitMQ支持消息的模式
2.1 简单模式 Simple
参考第12章节
2.2 工作模式 Work
类型:无
特点:分发机制
2.3 发布订阅模式
类型:fanout
特点:Fanout—发布与订阅模式,是一种广播机制,它是没有路由key的模式。
2.4 路由模式
类型:direct
特点:Direct模式是fanout模式上的一种叠加,增加了路由RoutingKey的模式
2.5主题Topic模式
类型:topic
特点:Topic模式是direct模式上的一种叠加,增加了模糊路由RoutingKey的模式。
2.6 参数模式
类型:headers
特点:参数匹配模式
3. 小结
rabbitmq发送消息一定有一个交换机

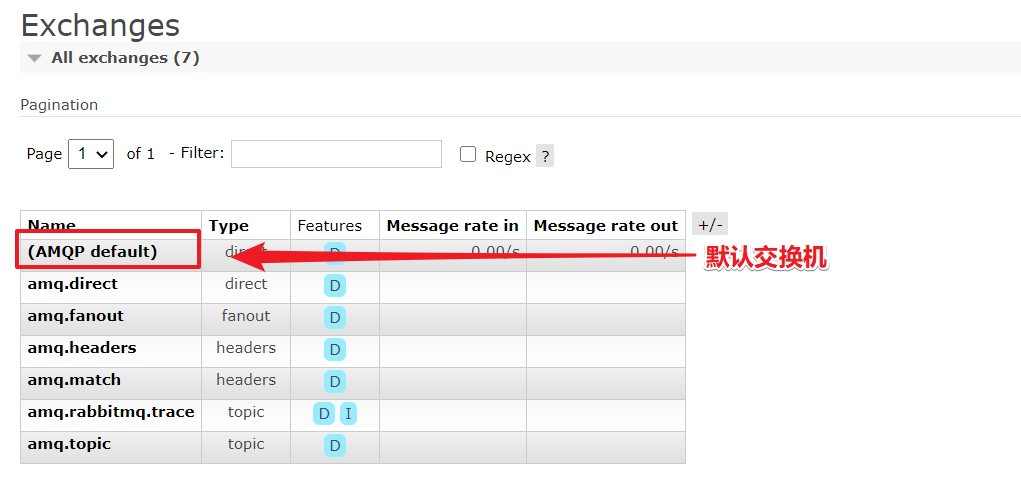
六、RabbitMQ入门使用
在进入代码之前,需要注意:消息都是通过交换机到达队列,如果代码中没指定,则会使用默认交换机
1. fanout模式
package com.wz.sdkservrabbitmq.util;

import com.rabbitmq.client.Channel;
import com.rabbitmq.client.Connection;
import com.rabbitmq.client.ConnectionFactory;

/**
 * @DESCRIPTION: MQ连接工具类
 * @USER: wangzhen
 * @DATE: 2022/9/1 23:16
 */
public class MQUtil {

    public static Connection getConnection() {
        // 1. 创建连接工厂
        ConnectionFactory connectionFactory = new ConnectionFactory();
        // 2. 设置连接属性
        connectionFactory.setHost("ip地址");
        connectionFactory.setPort(5672);
        connectionFactory.setVirtualHost("/");
        connectionFactory.setUsername("账户");
        connectionFactory.setPassword("密码");
        Connection connection = null;
        try {
            // 3. 从连接工厂中获取连接
            connection = connectionFactory.newConnection();
        } catch (Exception e) {
            e.printStackTrace();
        }

        return connection;
    }

    public static Channel getChannel(Connection connection) {
        Channel channel = null;
        try {
            channel = connection.createChannel();
        } catch (Exception e) {
            e.printStackTrace();
        }

        return channel;
    }

    public static void connectionClose (Connection connection) {
        if (connection != null) {
            try {
                connection.close();
            } catch (Exception ex) {
                ex.printStackTrace();
            }
        }
    }

    public static void channelClose (Channel channel) {
        if (channel != null && channel.isOpen()) {
            try {
                channel.close();
            } catch (Exception ex) {
                ex.printStackTrace();
            }
        }
    }


}
package com.wz.sdkservrabbitmq.fanout;
import com.rabbitmq.client.Channel;
import com.rabbitmq.client.Connection;
import com.wz.sdkservrabbitmq.util.MQUtil;
/**
* @DESCRIPTION: fanout模式,消息生产者
* @USER: wangzhen
* @DATE: 2022/8/19 12:24
*/
public class Producer {
public static void main(String[] args) {
//1. 获得连接
Connection connection = MQUtil.getConnection();
//2. 建立通道
Channel channel = MQUtil.getChannel(connection);
try {
//3. 创建一个direct路由模式类型的交换机
String exchangeName = "fanout-exchange";
String exchangeType = "fanout";
channel.exchangeDeclare(exchangeName, exchangeType, true);
//4. 创建队列
channel.queueDeclare("fanout-queue-1", true, false, false, null);
channel.queueDeclare("fanout-queue-2", true, false, false, null);
//5. 队列与交换机绑定
channel.queueBind("fanout-queue-1", exchangeName, "");
channel.queueBind("fanout-queue-2", exchangeName, "");
//6. 发送消息
String message = "吾之初心,虽死犹生!";
channel.basicPublish(exchangeName, "", null, message.getBytes());
System.out.println("消息发送成功!");
} catch (Exception e) {
e.printStackTrace();
} finally {
MQUtil.connectionClose(connection);
MQUtil.channelClose(channel);
}
}
}package com.wz.sdkservrabbitmq.fanout;
import com.rabbitmq.client.*;
import com.wz.sdkservrabbitmq.util.MQUtil;
import java.io.IOException;
/**
* @DESCRIPTION:fanout模式,消息消费者
* @USER: wangzhen
* @DATE: 2022/8/19 12:24
*/
public class Consumer {
private static Runnable runnable = () -> {
//1. 获得连接
Connection connection = MQUtil.getConnection();
//2. 建立通道
Channel channel = MQUtil.getChannel(connection);
//获取队列的名称
final String queueName = Thread.currentThread().getName();
try {
// 3. 定义接受消息的回调
System.out.println("开始接受消息");
channel.basicConsume(queueName, true, new DeliverCallback() {
@Override
public void handle(String s, Delivery delivery) throws IOException {
System.out.println(queueName + ":收到消息是:" + new String(delivery.getBody(), "UTF-8"));
}
}, new CancelCallback() {
@Override
public void handle(String s) throws IOException {
}
});
} catch (Exception ex) {
ex.printStackTrace();
System.out.println("收到消息出现异常...");
} finally {
MQUtil.connectionClose(connection);
MQUtil.channelClose(channel);
}
};
public static void main(String[] args) {
// 启动线程去执行
new Thread(runnable, "fanout-queue-1").start();
new Thread(runnable, "fanout-queue-2").start();
}
}2. direct模式
package com.wz.sdkservrabbitmq.fanout;

import com.rabbitmq.client.Channel;
import com.rabbitmq.client.Connection;
import com.wz.sdkservrabbitmq.util.MQUtil;

/**
 * @DESCRIPTION: direct模式,消息生产者
 * @USER: wangzhen
 * @DATE: 2022/8/19 12:24
 */
public class ProducerDirect {
    public static void main(String[] args) {
        //1. 获得连接
        Connection connection = MQUtil.getConnection();
        //2. 建立通道
        Channel channel = MQUtil.getChannel(connection);

        try {
            //3. 创建一个direct路由模式类型的交换机
            channel.exchangeDeclare("direct-exchange", "direct", true);
            //4. 创建队列
            channel.queueDeclare("direct-queue-1", true, false, false, null);
            channel.queueDeclare("direct-queue-2", true, false, false, null);
            //5. 队列与交换机绑定,并指定路由
            channel.queueBind("direct-queue-1", "direct-exchange","directTest");
            channel.queueBind("direct-queue-2", "direct-exchange","directTest");
            //6. 发送消息
            String message = "吾之初心,虽死犹生!";
            channel.basicPublish("direct-exchange", "directTest", null, message.getBytes());
        } catch (Exception e) {
            e.printStackTrace();
        } finally {
            MQUtil.connectionClose(connection);
            MQUtil.channelClose(channel);
        }

    }
}
package com.wz.sdkservrabbitmq.direct;
import com.rabbitmq.client.*;
import com.wz.sdkservrabbitmq.util.MQUtil;
import java.io.IOException;
/**
* @DESCRIPTION: direct模式,消息消费者
* @USER: wangzhen
* @DATE: 2022/8/19 12:24
*/
public class Consumer {
private static Runnable runnable = () -> {
//1. 获得连接
Connection connection = MQUtil.getConnection();
//2. 建立通道
Channel channel = MQUtil.getChannel(connection);
//获取队列的名称
final String queueName = Thread.currentThread().getName();
try {
// 3. 定义接受消息的回调
System.out.println("开始接受消息");
channel.basicConsume(queueName, true, new DeliverCallback() {
@Override
public void handle(String s, Delivery delivery) throws IOException {
System.out.println(queueName + ":收到消息是:" + new String(delivery.getBody(), "UTF-8"));
}
}, new CancelCallback() {
@Override
public void handle(String s) throws IOException {
}
});
} catch (Exception ex) {
ex.printStackTrace();
System.out.println("收到消息出现异常...");
} finally {
MQUtil.connectionClose(connection);
MQUtil.channelClose(channel);
}
};
public static void main(String[] args) throws InterruptedException {
new Thread(runnable, "direct-queue-1").start();
Thread.sleep(10000);
new Thread(runnable, "direct-queue-2").start();
}
}3. topic模式
注意:
表达式中单词必须以“.”分隔开
表达式中 “*” 可以代表一个单词
表达式中 “#” 可以代表零个或多个单词
package com.wz.sdkservrabbitmq.topic;

import com.rabbitmq.client.Channel;
import com.rabbitmq.client.Connection;
import com.wz.sdkservrabbitmq.util.MQUtil;

/**
 * @DESCRIPTION: topic模式,消息生产者
 * @USER: wangzhen
 * @DATE: 2022/8/19 12:24
 */
public class Producer {
    public static void main(String[] args) {
        //1. 获得连接
        Connection connection = MQUtil.getConnection();
        //2. 建立通道
        Channel channel = MQUtil.getChannel(connection);

        try {
            //3. 创建一个direct路由模式类型的交换机
            channel.exchangeDeclare("topic-exchange", "topic", true);
            //4. 创建队列
            channel.queueDeclare("topic-queue-1", true, false, false, null);
            channel.queueDeclare("topic-queue-2", true, false, false, null);
            //5. 队列与交换机绑定,并指定路由
            channel.queueBind("topic-queue-1", "topic-exchange","topic.*");
            channel.queueBind("topic-queue-2", "topic-exchange","topic.#");
            //6. 发送消息
            String message = "吾之初心,虽死犹生!";
            channel.basicPublish("topic-exchange", "topic.test1.msg", null, message.getBytes());
        } catch (Exception e) {
            e.printStackTrace();
        } finally {
            MQUtil.connectionClose(connection);
            MQUtil.channelClose(channel);
        }

    }
}
package com.wz.sdkservrabbitmq.topic;
import com.rabbitmq.client.*;
import com.wz.sdkservrabbitmq.util.MQUtil;
import java.io.IOException;
/**
* @DESCRIPTION: topic模式,消息消费者
* @USER: wangzhen
* @DATE: 2022/8/19 12:24
*/
public class Consumer {
private static Runnable runnable = () -> {
Connection connection = null;
Channel channel = null;
try {
//1. 获得连接
connection = MQUtil.getConnection();
//2. 建立通道
channel = MQUtil.getChannel(connection);
//获取队列的名称
final String queueName = Thread.currentThread().getName();
// 3. 定义接受消息的回调
channel.basicConsume(queueName, true, new DeliverCallback() {
@Override
public void handle(String s, Delivery delivery) throws IOException {
System.out.println(queueName + ":收到消息是:" + new String(delivery.getBody(), "UTF-8"));
}
}, new CancelCallback() {
@Override
public void handle(String s) throws IOException {
}
});
} catch (Exception ex) {
ex.printStackTrace();
System.out.println("收到消息出现异常...");
} finally {
MQUtil.connectionClose(connection);
MQUtil.channelClose(channel);
}
};
public static void main(String[] args) {
// new Thread(runnable, "topic-queue-1").start();
new Thread(runnable, "topic-queue-2").start();
}
}4. work模式
当有多个消费者时,我们的消息会被哪个消费者消费呢,我们又该如何均衡消费者消费信息的多少呢? 主要有两种模式: 1、轮询模式的分发:一个消费者一条,按均分配; 2、公平分发:根据消费者的消费能力进行公平分发,处理快的处理的多,处理慢的处理的少;按劳分配;
4.1 work轮询模式
package com.wz.sdkservrabbitmq.work.polling;

import com.rabbitmq.client.Channel;
import com.rabbitmq.client.Connection;
import com.wz.sdkservrabbitmq.util.MQUtil;

/**
 * @DESCRIPTION: work模式-轮询模式,消息生产者
 * @USER: wangzhen
 * @DATE: 2022/8/19 12:24
 */
public class Producer {
    public static void main(String[] args) {
        //1. 获得连接
        Connection connection = MQUtil.getConnection();
        //2. 建立通道
        Channel channel = MQUtil.getChannel(connection);

        try {
            //3. 创建一个fanout模式类型的交换机
            channel.exchangeDeclare("work-polling-exchange", "fanout", true);
            //4. 创建队列
            channel.queueDeclare("work-polling-queue-1", true, false, false, null);
            //5. 交换机绑定队列
            channel.queueBind("work-polling-queue-1", "work-polling-exchange", "");
            for (int i = 1; i <= 20; i++) {
                //消息的内容
                String message = "吾之初心,虽死犹生!============= " + i;
                // 5: 发送消息给中间件rabbitmq-server
                // @params1: 交换机exchange
                // @params2: 队列名称/routingkey
                // @params3: 属性配置
                // @params4: 发送消息的内容
                channel.basicPublish("work-polling-exchange", "", null, message.getBytes());
            }
        } catch (Exception e) {
            e.printStackTrace();
        } finally {
            MQUtil.connectionClose(connection);
            MQUtil.channelClose(channel);
        }

    }
}
package com.wz.sdkservrabbitmq.work.polling;
import com.rabbitmq.client.*;
import com.wz.sdkservrabbitmq.util.MQUtil;
import java.io.IOException;
/**
* @DESCRIPTION: work模式-轮询模式,消息消费者
* @USER: wangzhen
* @DATE: 2022/8/19 12:24
*/
public class Consumer {
private static Runnable runnableOne = () -> {
Connection connection = null;
Channel channel = null;
try {
//1. 获得连接
connection = MQUtil.getConnection();
//2. 建立通道
channel = MQUtil.getChannel(connection);
//获取队列的名称
final String queueName = Thread.currentThread().getName();
//3. 定义接受消息的回调
channel.basicQos(1);
channel.basicConsume(queueName, true, new DeliverCallback() {
@Override
public void handle(String s, Delivery delivery) throws IOException {
try {
System.out.println( "消费者One:收到消息是:" + new String(delivery.getBody(), "UTF-8"));
Thread.sleep(200);
} catch (InterruptedException e) {
e.printStackTrace();
}
}
}, new CancelCallback() {
@Override
public void handle(String s) throws IOException {
}
});
} catch (Exception ex) {
ex.printStackTrace();
System.out.println("收到消息出现异常...");
} finally {
// MQUtil.connectionClose(connection);
// MQUtil.channelClose(channel);
}
};
private static Runnable runnableTwo = () -> {
Connection connection = null;
Channel channel = null;
try {
//1. 获得连接
connection = MQUtil.getConnection();
//2. 建立通道
channel = MQUtil.getChannel(connection);
//获取队列的名称
final String queueName = Thread.currentThread().getName();
// 3. 定义接受消息的回调
channel.basicQos(1);
channel.basicConsume(queueName, true, new DeliverCallback() {
@Override
public void handle(String s, Delivery delivery) throws IOException {
try {
System.out.println("消费者Two:收到消息是:" + new String(delivery.getBody(), "UTF-8"));
Thread.sleep(2000);
} catch (InterruptedException e) {
e.printStackTrace();
}
}
}, new CancelCallback() {
@Override
public void handle(String s) throws IOException {
}
});
} catch (Exception ex) {
ex.printStackTrace();
System.out.println("收到消息出现异常...");
} finally {
// MQUtil.connectionClose(connection);
// MQUtil.channelClose(channel);
}
};
public static void main(String[] args) {
new Thread(runnableOne, "work-polling-queue-1").start();
new Thread(runnableTwo, "work-polling-queue-1").start();
}
}启动消费者,建立连接后,再启动生产者生成消息,可以发现消息是均匀的被两个线程消费。
4.2 work公平分发模式
package com.wz.sdkservrabbitmq.work.fair;

import com.rabbitmq.client.Channel;
import com.rabbitmq.client.Connection;
import com.wz.sdkservrabbitmq.util.MQUtil;

/**
 * @DESCRIPTION: work模式-公平分发模式
 * @USER: wangzhen
 * @DATE: 2022/8/19 12:24
 */
public class Producer {
    public static void main(String[] args) {
        //1. 获得连接
        Connection connection = MQUtil.getConnection();
        //2. 建立通道
        Channel channel = MQUtil.getChannel(connection);

        try {
            //3. 创建一个fanout模式类型的交换机
            channel.exchangeDeclare("work-fair-exchange", "fanout", true);
            //4. 创建队列
            channel.queueDeclare("work-fair-queue-1", true, false, false, null);
            //5. 交换机绑定队列
            channel.queueBind("work-fair-queue-1", "work-fair-exchange", "");
            for (int i = 1; i <= 20; i++) {
                //消息的内容
                String message = "吾之初心,虽死犹生!============= " + i;
                // 5: 发送消息给中间件rabbitmq-server
                // @params1: 交换机exchange
                // @params2: 队列名称/routingkey
                // @params3: 属性配置
                // @params4: 发送消息的内容
                channel.basicPublish("work-fair-exchange", "", null, message.getBytes());
            }
        } catch (Exception e) {
            e.printStackTrace();
        } finally {
            MQUtil.connectionClose(connection);
            MQUtil.channelClose(channel);
        }

    }
}
package com.wz.sdkservrabbitmq.work.fair;
import com.rabbitmq.client.*;
import com.wz.sdkservrabbitmq.util.MQUtil;
import java.io.IOException;
/**
* @DESCRIPTION: work模式-公平分发模式
* @USER: wangzhen
* @DATE: 2022/8/19 12:24
*/
public class Consumer {
private static Runnable runnableOne = () -> {
Connection connection = null;
Channel channel = null;
try {
//1. 获得连接
connection = MQUtil.getConnection();
//2. 建立通道
channel = MQUtil.getChannel(connection);
//获取队列的名称
final String queueName = Thread.currentThread().getName();
// 3. 定义接受消息的回调
Channel finalChannel = channel;
finalChannel.basicQos(1);
finalChannel.basicConsume(queueName, false, new DeliverCallback() {
@Override
public void handle(String s, Delivery delivery) throws IOException {
try {
System.out.println( "消费者One:收到消息是:" + new String(delivery.getBody(), "UTF-8"));
Thread.sleep(200);
finalChannel.basicAck(delivery.getEnvelope().getDeliveryTag(),false);
} catch (InterruptedException e) {
e.printStackTrace();
}
}
}, new CancelCallback() {
@Override
public void handle(String s) throws IOException {
}
});
} catch (Exception ex) {
ex.printStackTrace();
System.out.println("收到消息出现异常...");
} finally {
// MQUtil.connectionClose(connection);
// MQUtil.channelClose(channel);
}
};
private static Runnable runnableTwo = () -> {
Connection connection = null;
Channel channel = null;
try {
//1. 获得连接
connection = MQUtil.getConnection();
//2. 建立通道
channel = MQUtil.getChannel(connection);
//获取队列的名称
final String queueName = Thread.currentThread().getName();
// 3. 定义接受消息的回调
Channel finalChannel = channel;
finalChannel.basicQos(1);
finalChannel.basicConsume(queueName, false, new DeliverCallback() {
@Override
public void handle(String s, Delivery delivery) throws IOException {
try {
System.out.println("消费者Two:收到消息是:" + new String(delivery.getBody(), "UTF-8"));
Thread.sleep(2000);
finalChannel.basicAck(delivery.getEnvelope().getDeliveryTag(),false);
} catch (InterruptedException e) {
e.printStackTrace();
}
}
}, new CancelCallback() {
@Override
public void handle(String s) throws IOException {
}
});
} catch (Exception ex) {
ex.printStackTrace();
System.out.println("收到消息出现异常...");
} finally {
// MQUtil.connectionClose(connection);
// MQUtil.channelClose(channel);
}
};
public static void main(String[] args) {
new Thread(runnableOne, "work-fair-queue-1").start();
new Thread(runnableTwo, "work-fair-queue-1").start();
}
}启动消费者,建立连接后,再启动生产者生成消息,可以发现线程一消费的消息明显更多。
4.3 两者区别
代码方面区别:
消费者一次接收一条消息,代码channel.basicQos(0, 1, false);
公平分发需要消费者开启手动应答,关闭自动应答
关闭自动应答代码channel.basicConsume(“queue_test”, false, consumer);
消费者开启手动应答代码:channel.basicAck(ea.DeliveryTag, false);
实际业务方面区别:
当队列里消息较多时,我们通常会开启多个消费者处理消息;公平分发和轮询分发都是我们经常使用的模式。
轮询分发的主要思想是“按均分配”,不考虑消费者的处理能力,所有消费者均分;这种情况下,处理能力弱的服务器,一直都在处理消息,而处理能力强的服务器,在处理完消息后,处于空闲状态;
公平分发的主要思想是”能者多劳”,按需分配,能力强的干的多。
5. rpc模式
RPC模式的工作方式:
服务端监听rpc-request-queue队列,如果有消息,消费消息执行对应的逻辑,并且通过消息的properties的replyTo,correlationId回应客户端
客户端发送消息到服务端,并携带properties的replyTo,correlationId两个属性,同时客户端监听replyTo,利用BlockingQueue阻塞特性,如果没有take取数据时没有取到数据就进入等待,直到服务端完成对应的逻辑。
使用条件:需要通知远程计算机运行功能并等待返回运行结果。这个过程是阻塞的。
package com.wz.sdkservrabbitmq.rpc;


import java.io.IOException;
import java.io.UnsupportedEncodingException;
import java.util.UUID;
import java.util.concurrent.ArrayBlockingQueue;
import java.util.concurrent.BlockingQueue;
import java.util.concurrent.TimeoutException;

import com.rabbitmq.client.AMQP;
import com.rabbitmq.client.Channel;
import com.rabbitmq.client.Connection;
import com.rabbitmq.client.DefaultConsumer;
import com.rabbitmq.client.Envelope;
import com.wz.sdkservrabbitmq.util.MQUtil;


/**
 * @DESCRIPTION: 客户端
 * @USER: wangzhen
 * @DATE: 2022/9/6 17:25
 */
public class RpcClient {
    private Connection connection;
    private Channel channel;
    private String requestQueueName = "rpc-request-queue";
    private String responseQueueName;

    public RpcClient() throws IOException, TimeoutException {
        //获得连接
        connection = MQUtil.getConnection();
        //建立通道
        channel = MQUtil.getChannel(connection);
    }

    //请求返回
    public String call(String message) throws UnsupportedEncodingException, IOException, InterruptedException{
        //自动生成对列名, 非持久,独占,自动删除
        responseQueueName = channel.queueDeclare().getQueue();
        //生成关联id
        String correlationId = UUID.randomUUID().toString();

        //构建消息携带的props
        AMQP.BasicProperties props = new AMQP.BasicProperties
                .Builder()
                .correlationId(correlationId)//队列的唯一值认证
                .replyTo(responseQueueName)//回调队列
                .build();

        //发送消息
        channel.basicPublish("", requestQueueName, props, message.getBytes("utf8"));

        //用来保存结果的阻塞集合,取数据时,没有数据会暂停等待
        final BlockingQueue<String> response = new ArrayBlockingQueue<String>(1);

        //接收返回数据
        channel.basicConsume(responseQueueName, true, new DefaultConsumer(channel){

            @Override
            public void handleDelivery(String consumerTag, Envelope envelope, AMQP.BasicProperties properties, byte[] body)
                    throws IOException {
                if(properties.getCorrelationId().equals(correlationId)){
                    response.offer(new String(body, "utf8"));
                }
            }

        });

        //返回保存在集合中的响应数据,如果没有取到数据会进入等待
        return response.take();
    }

    //关闭连接
    public void close() throws IOException{
        if(connection!=null){
            this.connection.close();
        }
    }


    public static void main(String[] args){
        RpcClient rc = null;
        try {
            rc = new RpcClient();
            System.out.println("发送消息");
            String response = rc.call("发送消息|");
            System.out.println(response);
        } catch (Exception e) {
            e.printStackTrace();
        } finally {
            try {
                if(rc!=null){
                    rc.close();
                }
            } catch (IOException e) {
                e.printStackTrace();
            }
        }
    }
}
package com.wz.sdkservrabbitmq.rpc;
import java.io.IOException;
import java.util.concurrent.TimeoutException;
import com.rabbitmq.client.AMQP;
import com.rabbitmq.client.AMQP.BasicProperties;
import com.rabbitmq.client.Channel;
import com.rabbitmq.client.Connection;
import com.rabbitmq.client.Consumer;
import com.rabbitmq.client.DefaultConsumer;
import com.rabbitmq.client.Envelope;
import com.wz.sdkservrabbitmq.util.MQUtil;
/**
* @DESCRIPTION: 服务端
* @USER: wangzhen
* @DATE: 2022/9/6 17:27
*/
public class RpcServer {
private static final String RPC_QUEUE_NAME = "rpc-request-queue";
public RpcServer() throws IOException, TimeoutException {
//1. 获得连接
Connection connection = MQUtil.getConnection();
//2. 建立通道
Channel channel = MQUtil.getChannel(connection);
channel.queueDeclare(RPC_QUEUE_NAME, false, false, false, null);
channel.basicQos(1);
Consumer consumer = new DefaultConsumer(channel) {
@Override
public void handleDelivery(String consumerTag, Envelope envelope, BasicProperties properties, byte[] body)
throws IOException {
AMQP.BasicProperties props = new AMQP.BasicProperties
.Builder()
.correlationId(properties.getCorrelationId())
.build();
String response = "";
try {
String message = new String(body,"UTF-8");
response = dealMethod(message);
} catch (RuntimeException e) {
e.printStackTrace();
} finally {
channel.basicPublish( "", properties.getReplyTo(), props, response.getBytes("UTF-8"));
//手动确认消息已接收
channel.basicAck(envelope.getDeliveryTag(), false);
}
}
};
//消费者开始接收消息, 等待从 rpc-request-queue接收请求消息, 不自动确认
channel.basicConsume(RPC_QUEUE_NAME, false, consumer);
}
//接收到消息处理的具体方法
private static String dealMethod(String message) {
message +="加了点内容返回";
try {
Thread.sleep(20000);
} catch (InterruptedException e) {
e.printStackTrace();
}
return message;
}
public static void main(String[] args) {
try {
new RpcServer();
} catch (Exception e) {
e.printStackTrace();
}
}
}